Selling User Manual for Individually Owned Stores: Step by Step
First of all, thank you for choosing to host your store on Hyena Cart. The HC interface may be different than what you're accustomed to, so this tutorial is here to help walk you through your initial set up. Hopefully, once you get the hang of it, you'll find that HC is the most flexible and easy-to-use online cart you've ever tried :)
- Logging into your store
- Forgotten passwords
- Store settings
- Profile Page settings (including preview settings, landing page, navigation menu, shipping option names, and vacation mode)
- Setting up your store front
- Replacing the Hyena Cart logo with your own
- Applying a template
- Integrating a logo into a template
- Getting more creative with your shop design
- Other store settings
- Product listings
- Adding or editing a listing
- Types of listings
- Go Live and End Dates
- Tags
- Images
- Choices
- Shipping
- Flat-rate Shipping
- Pattern download information
- View / edit items
- Batch editing items
- The calendar
- The site search
- Spots (marking as favorite)
- Orders
- How to promote your store
Logging into your store
After you have submitted your application, there may be a delay of up to 24 hours before you receive the informational email with your login info, etc. If you have not received this email after 24 hours, please check your spam folder (emails get lost there pretty frequently). If there's still nothing, please contact us at the help desk and we'll get you set up.
Once you've received your informational email, please log out and log back in to indieCart. After you do so, you'll see the Manage Store link in the menu under your name in the upper right-hand corner of the site:

Note the link on the login page for forgotten password recovery. You can click that link in the event that you forget / lose your login information. Just click the link and follow the directions.
Store Settings
When you first log in, you'll be greeted with this page, which contains the most recent updates from the indieCart forums, and quick links to key vendor pages:

You'll want to keep an eye on these announcements as they'll contain relevant information for you. Note that your paid date (i.e., the date until which your store is paid up) is always shown in the upper right corner of your vendor pages.
Store Settings :: Profile Page
- To begin your store set up, start by going to the first menu option under Store Settings, the Profile Page:

- Let's quickly run through the settings on this profile page.
- First name: this should be your first name and will be used at the bottom of the purchase confirmation emails that go out to your customers.
- E-mail address: This is the email address that will receive your sales notifications and store inquiries.
- Paypal address: This is the email address which is linked to your Paypal account. Note that this needs to be a business or premier account in order for the inventory control to work correctly.
- Currency: Please choose the currency in which you would like your items listed.
- Allow check/MO payment:You can choose to accept check or MO payments here. Note that many shop features will not function correctly when payment by MO or check is made. For example, inventory control on Standard listings and the Hold-style listings will not work correctly.
- Store templates: If you would like to use one of our pre-made store templates, simply click on the image and follow the directions. More details about how this works can be found in the Store Customization section.
- Product type: You can choose up to 3 categories under which your store will be listed for display on the "List HC stores by product" page.
- Intro / main page header: This is where you can customize the appearance of your store. You can put some simple text, just as a
message to your shoppers, or you can add css / html code to change the appearance of your store. This page
gives some tips. You can also use the
templates as a jumping off point and modify them to suit your taste. If you would like to hire a designer to help you with this, there are
many listed here and here who work at very reasonable rates.
This is the real heart of how you will control the look and feel of your store, so more details will be discussed in the Store Customization section. This is one of the main advantages of a Hyena Cart store -- you can control almost every aspect of your store's appearance (unlike other sites, where your store follows a very similar template to everyone else's). But with this flexibility comes a bit of complexity. We'll walk you through it so hopefully it won't be too difficult :) - Mainsite image: There is a link at the bottom of the store that reads "Bizname home page". If you define an image here, the text will be replaced with that image. The link leads to the url you have defined in the Biz url field. Again, this image must be hosted externally, on a site like Photobucket or some other server.
- Contact me image: There is a link at the bottom of the store that reads "Contact bizname". If you define an image here, the text will be replaced with that image. The link leads to the email address you have defined in the E-mail address field. Again, this image must be hosted externally, on a site like Photobucket or some other server.
- Powered by image: There is a link at the bottom of the store that reads "Powered by Hyena cart". If you define an image here, the text will be replaced with that image. The link leads to the main Hyena Cart site. You can eliminate any of the preceding three images and links by entering the url http://hyenacart.com/Hyena_images/blank.gif in the respective field. Again, this image must be hosted externally, on a site like Photobucket or some other server.
- Counter code / main page footer: If you would like to track the traffic stats on your store (how many clicks, where did people come from, etc.), you can sign up with a number of free traffic stat services and enter the code here (my favorite is Stat Counter). You can also enter any html code that you wish to have appear at the bottom of your store here.
- Use navigation menu: This determines whether or not the collapsible navigation menu on the left hand side of the store is used (default is yes)
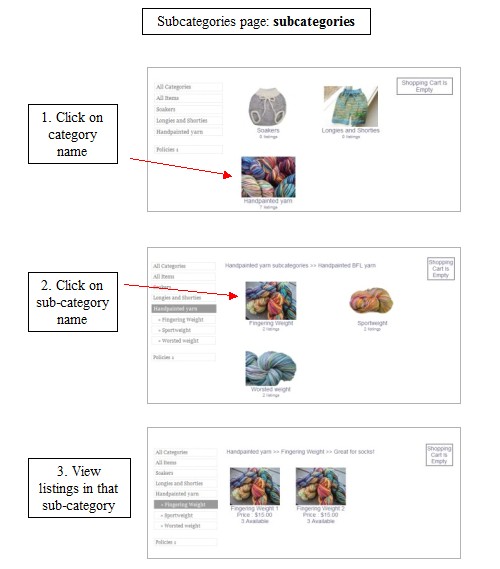
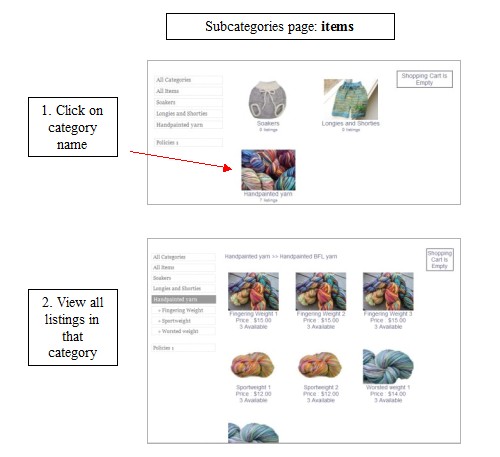
- Subcategories page: This determines whether the shopper sees a listing of subcategories or items for sale when they click on a category link (default is items). If you have a lot of listings in your store, it may be easier for your shopper to see a listing of subcategories. Otherwise, shoppers tend to prefer fewer clicks to get to store listings, so the item view is better.
- Previews: You'll see when you begin listing items that each listing has a "Go live date" as well as an "End date." If Preview is set to "no", then items whose "Go live date" has not yet happened will not show up in your store. If it is set to "yes", then those items will show up in your store. Most sellers set this option to "yes" because it allows them to create listings that will become active at a future time and "preview" them, allowing shopper interest to build.
- Landing: This setting sets the landing page for your store (i.e., the view that will greet shoppers when they click on your store link). The
"All categories" setting will show the shopper your store categories, the "View all" setting shows all of the listings, and the "Table view" setting again shows all the listings,
but in a somewhat different format. If there are not too many items listed in your store (fewer than 20 or so), "View all" or "Table view" are the shopper-preferred
views. Note that if you choose "Table view", any images you have uploaded for categories and subcategories will not be used in your store.
Landing set to "All categories":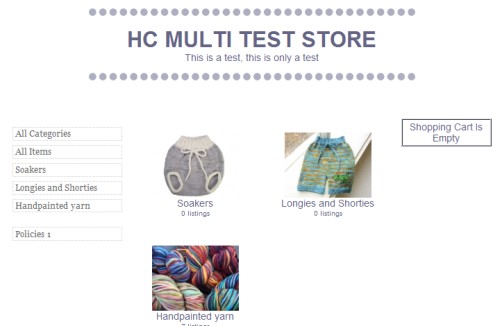
Landing set to "View all":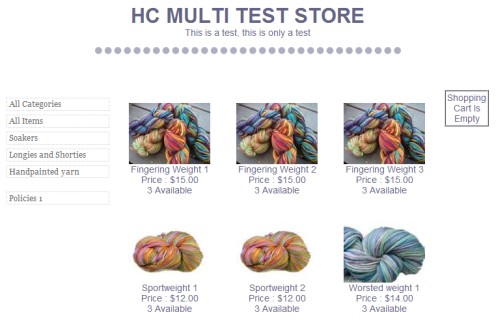
Landing set to "Table view":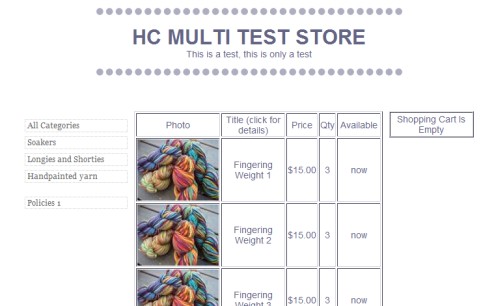
- Accept echecks immediately: When listing in "Standard" mode, the item is not taken out of stock until Paypal payment is made. In the case of a shopper paying via e-check rather than instant cash, you have the option of allowing the cart to take this item out of stock as soon as the echeck payment is made, or not until the echeck clears. Note that if you set this option to "no" and the item remains in stock until the echeck clears, another shopper may purchase the item and check out in the interim. On the other hand, if this option is set to "yes", the item will be taken out of stock and will be unavailable for purchase even if the check subsequently doesn't clear. You will then need to manually re-stock the item.
- Width of store table: This sets the width of the store table in pixels. 780 pixels is the standard, but this can be changed to accommodate special store designs, etc.
- Minimimize cart: Your store pages will display an interactive shopping cart (Minicart) on each page to let the shopper know what is currently in his or her basket.
There are two ways this cart can be displayed: one with "Minimize cart" set to "no," and one with "Minimize cart" set to "yes." When "Minimize cart" is set to "no," the shopper
sees much more detail regarding the items in the cart. However, the space taken by the cart may interfere with some store designs. With "Minimize cart" set to "yes," only the
number of items and overall value of the cart is displayed, and there is minimal disruption to the store design:

- Show past items: If you would like to have a link at the bottom of your store to you past items, set this option to "yes."
A note about past items: for Standard, Buy Now, and Hold listings, once the end date of the listing has passed, the item will no longer be displayed in your store. Auctions and Drawings remain in the store for a week past their end times to allow shoppers to view the listings and see who won. If you would like to move an Auction or Drawing to Past Items sooner than this, you can edit the end date further back into the past after the listing has ended. For more details regarding setting end dates, click here. - Past items image: Similar to the "Mainsite image" and "Contact me" images above, if this option is set to the url of an image, and "Show past items" is set to "yes", then this image will appear at the bottom of your store, hotlinked to your Past Items page.
- Shipping Option Names: The names of your shipping options are fully customizable. You can enter up to 5 shipping options here, and then define amounts for each option within the listing pages. If you don't define any options the default methods of shipping are: First-class, Priority, UPS, FedEx, and International.
- Offer shipping insurance: If this is set to "yes", then your customers will have the option of adding insurance to the first two shipping options as defined in the field above. Shipping insurance rates are calculated based on the USPS rates.
- Vacation mode: When this option is set to "yes", your store is deactivated and shoppers will not be able to view or purchase listings in your shop. Note that your store remains active for 6 months after your paid time has expired, meaning shoppers can still shop your store. So if you are taking a break, it's best to set your store to vacation mode.
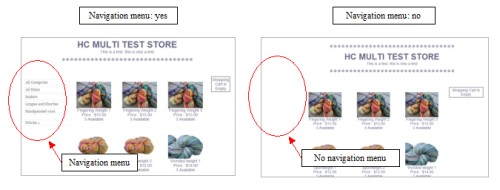
For example, when Subcategory page is set to "subcategories", it takes 2 clicks in your store to get to the listings:
and when Subcategory page is set to "items", it takes only 1 click in your store to get to the listings:
Setting up your storefront
After your store has been set up, it will look very basic:

You have quite a few options for customizing the look and feel of the store:
- If you have no knowledge of web design, you can:
- Leave the design as basic as it is, simply replacing the Hyena Cart logo with your own
- Use one of the free templates on the Profile page
- Hire a designer to create a custom design for you (see this page for a list of designers -- scroll down to the bottom of the page)
- If you have some knowledge of web design, you can:
- Check out this page for tips
- Use one of the free templates on the Profile page, then modify it to your liking
- Adapt the design on your existing website to create a seamless shopping experience for your customers (see, for example, Kool Sheep Soakers)
Replacing the Hyena Cart logo with your own
First of all, if you don't already have a logo, you can simply leave the Biz logo field on your Profile Page blank (by default it has "http://hyenacart.com/Hyena_images/hyenacart_logo_long_sm.jpg" in that field). Just go ahead and delete it. If you'd like help creating a logo, please consult the list of designers at the bottom of this page.
If you do have a logo, ensure that it is uploaded to the internet somewhere. If you have not done this before, take a look at this tutorial. Or, if you have your own server space you can upload your image there (if you don't know what that means, just ignore it for now). Then enter the url of your logo into the "Biz logo" field on your Profile Page.
For example, entering the url of this image like this:

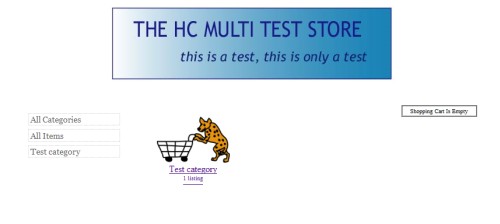
Results in a store that looks like this:
Applying a template
Even without a logo, it is easy to create a nice looking, professional shop by utilizing the pre-made shop templates.
Start by choosing one of the templates from the Profile page. Clicking on the design of your choice will bring up a pop-up window with instructions. For this demonstration, I have chosen the Blue Dots. Follow the instructions on the pop-up page, copying and pasting the text from the appropriate fields:

When you're done, click "Update config" at the bottom of the Profile page.
Your store now looks like this:
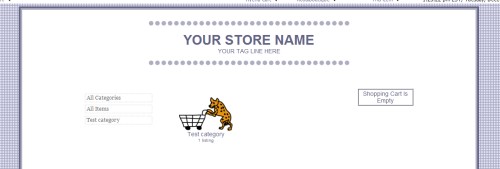
which is almost right, but how to replace the "Your store name" and "Your tagline here" with your own information?
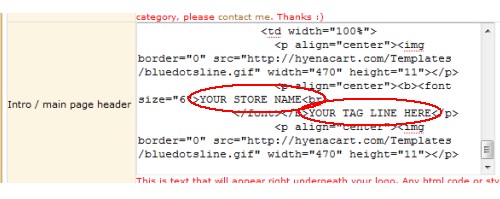
Go back to the Profile page and scroll down to the "Intro / main page header" field. Scroll through the text in that field until you see, almost at the bottom, the text "YOUR STORE NAME" and "YOUR TAGLINE HERE":
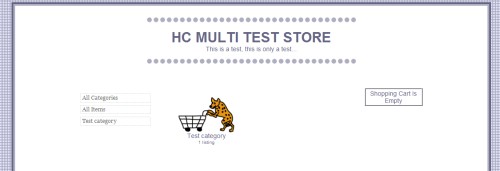
Integrating a logo into a template
If you'd like to integrate your existing logo into one of the store templates, you'll need to figure out where you would like your logo to appear, then replace that portion of the template with the correct html code to display your image. In this case, it may be desirable to replace the Store name and tagline with an image instead. We could do this by replacing this text in the "Intro / main page header" field with the html code <*img src="http://pathtoyourimage" *> (without the *'s and replacing "http://pathtoyourimage" with the url of your image:

Now your store looks like:
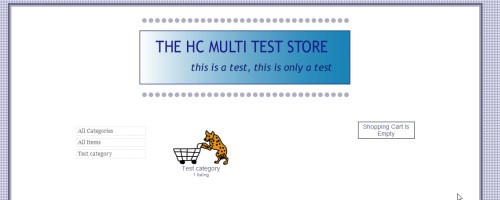
(note for these examples with the templates, the "Biz logo" field has been left blank.)
Getting more creative with your shop design
If you're comfortable with html and css, there is almost no limit to how you can affect the appearance of your store. There is this page, which has some tips, or you can just start experimenting on your own.
Finally, as mentioned earlier, you can hire a designer to create a unique and beautiful shop (see this page for a list of designers -- scroll down to the bottom of the page).
Here's a list of some wonderfully designed Hyena Cart shops to inspire you :)
Other store settings
OK! Now that you have your storefront looking nice, it's time to set up the other parts of your shop.
Categories
The next thing you'll want to do is add Categories to your store.
If you do not stock too many items at a time, you may choose to create one single category, titled "All" or "Everything." Otherwise, choose how you would like to categorize your inventory and add those categories.
Additionally, you have the option of adding subcategories beneath your categories (for example, under Jewelry, you may add subcategories for Earrings, Bracelets, Necklaces, etc.)
Your categories will show up in several places: 1) in the left-hand navigation menu; 2) when "All categories" in the left-hand menu is clicked. Your subcategories will show up in the left-hand nav menu. They will also be visible when category is clicked *if* you have the "Subcategories page" option on your Profile page set to "subcategories" and not "items."

When you first log in to your new Hyena Cart store, there will be one Test Category and one Test Subcategory already created. You can delete these or simply edit them to names appropriate to your store. Note that you need to create at least one category, but all other categories and subcategories are optional.
Go to the Store Settings >> Edit categories menu choice to manage your categories.
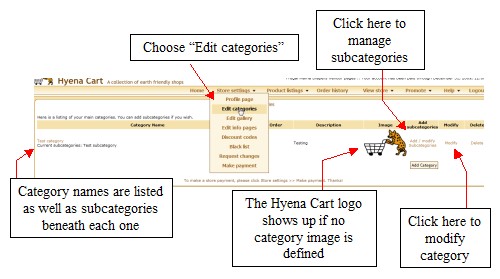
Clicking on "Modify" brings up the following form:

- Category name: This is the name of the category, which will show up in the left-hand navigation menu, as well as underneath the category image icon.
- Category Order: This sets the order in which your categories appear. If you initially set these as 10, 20, 30, etc., you'll have room in the future to insert categories between your originallly created categories.
- Category Description: This will show up in the "breadcrumb trail" at the top of your category pages (see 3 images up from here).
- Image: This is where you set the image that represents the category. You can enter the url here, similar to what we did for your "Biz logo" on the Profile page.
When you're ready, click "Save modification" to save your changes.
If you would like to add Subcategories to any of your categories, click the "Add / modify subcategories" link. This will take you to a similar page, with a listing of the subcategories underneath that category. You can modify those subcategories in a similar manner.
Note that if you chose "Table view" as your landing page, your category images will not be shown anywhere in your store. And if you choose "Items" as your subcategory page, your subcategory images will not be shown anywhere in the store.
Finally, note that deleting a category deletes all the product listings in that category, so please be careful in deleting categories!
Gallery
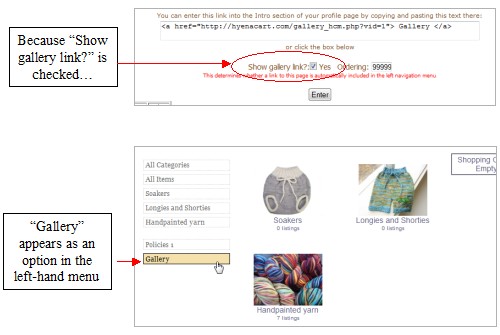
You can set up a gallery for your store to show off your past work (this is optional). Just go to the menu option Store settings >> Edit gallery. You will see this page:

The top section of the page is informational, with a few instructions as well as a link to your gallery so you can view it as you make edits. The html code to link to the gallery is also given, in case you would like to customize your page layout and place the gallery link in a specific location.
The second section determines whether or not the gallery link will appear in the left-hand menu, and in which order it will appear among your info pages (we'll discuss info pages in the next section).
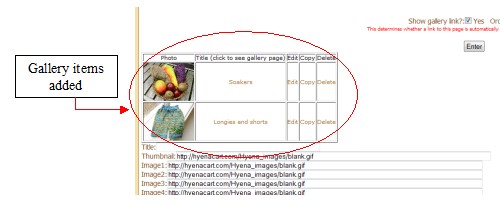
The third part of the form is where you can add new items to your gallery. Gallery items will appear in a table form, and clicking on the thumbnail will open the page for that gallery item. Each item can have up to 4 images and some descriptive text associated with it.
Let's first add a few gallery entries. Just type in the title of the gallery listing (e.g., Soakers), then the url's of your images (this should start to feel familiar!). If you are adding fewer than four images, leave the remaining fields the way they are. If you have upgraded to image hosting, just leave the image fields the way they are for now, and we can add the images after the listing has been created. Finally, add in some descriptive words (if you like, this can be left blank).

Info pages
Info pages can be used to give shoppers more information about your store, for example: policies, shipping info, care instructions, etc. The fields should be fairly self-explanatory:
- Title: The name of your informational page.
- Order: The order in which the informational page will appear in the left-hand navigation menu.
- Description: The text you would like to have appear on your informational page.
- Show menu link?: Whether or not you would like the informational page to appear as a link in the left-hand menu.

Discount codes
You can set discount codes freom the Store Settings >> Discount codes page. Simply enter the code you would like to use and choose from the options: $ amount, % amt, or freeship. You can let shoppers know about the promotion in the text at the top of your store (the "Intro / main page header" field on the Profile page), send it out to a mailing list, post on your Facebook page, etc. The shoppers will enter the code at checkout to receive their discount. There is no limit to the number of codes you can set. Just remember to delete codes that are no longer in use.
Blacklist
Unfortunately, there may come at time when you wish to block certain shoppers from purchasing items in your store. They may have a history with you of purchasing without payment, or bidding on auctions without payment. You can access your blacklist page at Store Settings >> Black list. You can enter shopper email addresses here to block them from purchases of "Buy Now", "Hold," "Auction" and "Drawing" listings (more on those later). However, since Standard listings do not require shopper login before purchase, blacklisting a shopper does not preclude them from purchasing a Stadard-ly listed item.
Requesting changes
The Store Settings >> Request changes page gives you options for changing your image hosting option, requesting a switch to a different Hyena Cart store format (HC Multiple-checkout to HC Single-checkout or vice-versa), changing the name of your store, or requesting a store deletion. Simply click the appropriate link and follow the directions to make your request.
Making a payment
You can make a payment for your store from the Store Settings >> Make payment page. Recall that you only need to 'pay as you go' (you never have to pay back fees). If your paid time expires, your store will remain active for 6 months (shoppers will still be able to make purchases). However, you will be unable to edit, delete, or copy listings until you make a payment. After six months, your store will show up as inactive. Also note that in order to be displayed in the directory and have your listings show up in searches, your paid date must be within the past two months.
To re-activate your store, you simply need to log in and make a payment from the payment page. The payment should process almost immediately. Occasionally, the Paypal server does not work correctly and the paid date does not update. If this occcurs, give it a few hours, and if your paid date still hasn't updated, please forward a copy of your Paypal receipt to payments [at] hyenacart.com with the subject line "Payment error."
Product listings
All right! You have your store set up now with a professional looking design and at least one category. Now you can start adding listings. Note that if you just signed up for a store, you will have a couple days' worth of paid time to play around with product listings. However, once you're ready to list in earnest, you will need to make your first monthly payment.
Adding or editing a listing
So let's move on to the next menu option over to the right: "Product listings," and highlight "View / edit items."

The first thing you'll see is that the products are broken into four sections: Future items, Current items, Past items (ended within the past month), and Past items (ended over a month ago). We'll talk about that more in a second. Let's start out by deleting the test listing that was created for your store. Just click "Delete" to the right of that listing. (Note, if you deleted the Test category, or Test subcategory, then this listing will not exist anymore. You saved yourself a step :) ). When the confirmation pop-up comes up, go ahead and click "OK" to confirm the deletion.
Now let's add a new listing. Click on one of the "Add product" buttons (or go to Product listings >> Add item. That will bring up your product listing form. Let's go through the fields one-by-one:
- Category: The first thing you'll need to do is choose which category you would like to add your listing to. The drop-down menu will list all of the Categories
and Subcategories you defined on your Store settings >> Edit categories page. You can choose any of your categories or subcategories.
If you choose to place a listing in a subcategory, your listing will be placed within that subcategory:
If you choose to place a listing in a category when a subcategory exists, your listing will be placed in this manner in your store:
If there are no subcategories beneath a category in which an item is listed, the item listing will appear when the category is clicked. - Product name: Fill in your product name here. For best results, keep it simple text, with no html code.
- Stocktype: Here's one of the fun things about Hyena Cart -- there are five ways you can list your item: Standard, Hold, Buy Now, Auction and Drawing. For
a detailed description of each stocktype, click the "Stocktype Descriptions" link to the right of this field. In most cases, Standard will be the best choice. This
listing method behaves most like a typically stocked item in a store. You can set quantities to any number, you can offer choices (like colors, add-ons, etc.) and
the item remains in-stock until the shopper checks out and pays for the item.
The other four options are for high-demand scenarios where more than one shopper is likely to try to purchase an item simultaneously. They are designed to prevent oversells, but are limited in that you can only offer a quantity of 1, and no choices can be defined. - Go live date : This is the date on which your listing will become active. You can set it for anytime, past / present or future.
- If "Preview" on your Store Settings >> Profile page is set to "no," then the listing will not be visible in your store until the "Go live date."
- If "Preview" is set to "yes," then your item will appear in your store, but will be unavailable for purchase until the "Go live date."

- End date: For most items, you will want to leave the end date as all 0's ("0000-00-00 00:00:00"). This simply means there is no end date, you just want the listing to show up in your
store until it sells and you delete it or move it to past items.
For Auctions and Drawings, and any listings for which you would like to define an end date, this is the field in which to define it. Note that auction bidders are deleted after 3 months, and drawing entrants are deleted after 30 days, so you do not want to run the listings for longer than that. - Order: This number determines in which order this listing will appear among the other listings.
- Show: Checking this box allows the listing to be shown in your store. If you are working on some listings, and aren't ready for them to go public yet, you can uncheck this box and check it when you are ready.
- Description: This is where you fill in the description of your item. You can use the editor to format your text as you like.
- Tags: Tags are searchable by shoppers and can be a great way for them to find your items. Clicking on the "Choose tags" button bring up a window with many
standard Hyena Cart tags.
Three things to remember about tags:- It is a good idea to enter your store name as a tag as shoppers often type store names into the search bar.
- make sure that your items are tagged correctly to come up in the searches that are linked from the main HC page: (see under Knitted & Crocheted Items, for example, that the search for socks uses the terms "knit socks". If you are listing hand-knit socks, make sure those terms are in your tags.)
- If you use the "copy listings" function, be sure to update your tags for the new listings -- deleting the old tags and adding new ones
- Price: Set your price here. The currency is defined on your Store settings >> Profile page in the Currency field.
- Qty in stock: List the number of items you have in-stock here.
A few points to keep in mind:- If you have an unlimited quantity of something, just set this number to something high (like 999). In the future, there will be an option to set quantity to "unlimited", but we haven't gotten there yet.
- The quantity for Buy Nows, Auctions, and Drawings is limited to 1. If you enter something other than 1 for these types of listings, your entry will be overwritten by "1" when you update the listing
- If you use the choice options below, and set quantities for your first choice, the sum of those quantities will overwrite the quantity you enter in this field (more on that in the choice section)
- Image: Images are entered here in the same manner we have discussed in the Biz Logo, Category and Gallery sections. You can choose to use externally
hosted images (on Photobucket or your own server), or you can upgrade to image hosting for an extra $2.50 per month and load images directly from your hard drive.
The thumbnail image is used to represent your listing in your store (when the shopper is viewing multiple listings), as well as in the site search. The rest of the images will appear in your listing. - Choice 1: On Standard listings, you can create choices to give your shoppers more options for their purchase. For example, Colors or Sizes. You can define
the choices in these fields as well as any add-on pricing associated with the choices, and inventory, if appropriate.

If you ever find that your choices fields are getting cut off, it is because your choice lists are too long and the database field is too short. Please email the support desk at support [at] hyenacart.com and we can lengthen the database fields for you. Don't forget to tell us which store is yours! - Choices 2-6: These are additional choices that can be defined for the listing. Note that only Choice 1 has the option of inventory control.
- Shipping: As mentioned in the Profile page section, Shipping options are completely customizable by the seller (you can define up to 5 options). If you don't define
any options the default methods of shipping are: First-class, Priority, UPS, FedEx, and International.
For each listing, you can define which shipping options are available, and two prices: 1) the price of shipping if this is the only item ordered (single-item shipping); 2) the price of shipping if this item is added to an exisiting order (add-on shipping).
In the case of an order with multiple items, the highest single-shipping price is used, and then add-on shipping prices of the remaining items in the order are added. Only overlapping shipping options are available for the shopper to choose from upon checkout.
If there are no overlapping shipping options within the items ordered, shipping is not calculated for the order: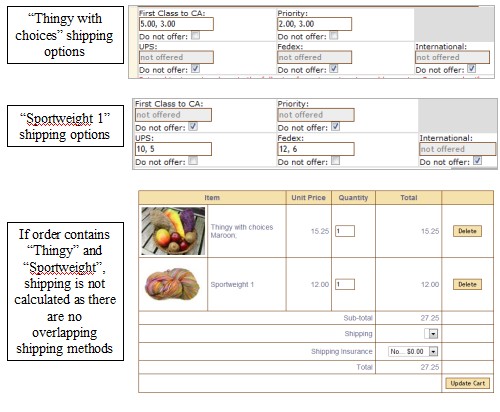
Flat rate shipping:
To set your store up to offer flat-rate shipping (same shipping rate regardless of the number of items purchased):- Go to Store settings >> Profile page, and in the Shipping options fields enter "Flat rate shipping"
- For each of your listings, enter, for example "4.95, 0" for the shipping amount (if you want to set the flat-rate to $4.95)
- Pattern download info: If you sell patterns, you have the option of using this "Pattern download info" field. You can enter the link and password to your pattern here and the information will not be accessible to the shopper until payment on the order has been made. Of course, you can also choose to email the pattern to the customer after payment is made, but this "Pattern download" field saves you the step :)
If you set the "Go live date" to sometime in the past or to the current time, then the item will show up in your store and be available for purchase immediately.
If you set the "Go live date" to a date in the future, then one of two things will happen:
Also note that, on your Product listings >> View / edit items page, the item is now listed in the "Future items" section.
Why do sellers set "Go live dates" in the future rather than making their items available for immediate purchase?
In most cases, it is to generate excitement for the store's stocking. A new item listed every few days may be missed, but a periodic stocking with many new items is more of an event and can pull more shoppers in at a time.
In addition, some sellers have items which are in very high-demand, with multiple shoppers who would like to purchase each item. Prevewing the item gives all the shoppers a chance to view what will be available, decide which item is most desirable to them, and make plans to be on-line to purchase the item when it goes live.
View / edit items
OK -- after you've added a few listings, let's head back to the Store listings >> View / edit items page.
You'll see a page with multiple columns shown for each listing. Most are self explanatory (product name, thumbnail, price, etc.). There are a few that need a bit more explanation:
- Stocktype: This field lists the stocktype of the item. For Auctions and Drawings, it is also clickable and brings up a list of bidders or drawing entrants. With the drawing extrants, you are able to delete entrants, if necessary
- Buyer: This field is used for Buy Now, Hold, Auction and Drawing listings. They give you feedback on who the purchaser is, in case emails or order creation do not work correctly (sometimes, in high-demand situations, with lots of shoppers clicking refresh at the same time, things don't work 100% properly)
- Spots: This field shows the number of times an item has been "Spotted" (marked as a favorite) by a shopper
- Modify w/ html: Most users will simply use the "Modify" link to modify listings. However, some sellers prefer to write the description portion of the listing in html code rather than using the what-you-see-is-what-you-get editor. The "Modify w/ html" (and the "Add product w/ html button") takes you to a product listing page where the description field takes simple text / html entry
- Copy and Delete: These links can be used to Copy and Delete listings
Batch editing items
There are three pages under Product listings >> Batch edit which allow you to edit all of your listings simultaneously.
One allows changes in Go Live and End dates, one is for Descriptions and Tags, and the last is for Shipping amounts. All three pages also allow you to edit Product names, the Show setting, and allow for item deletion. In addition, the Batch Edit >> Dates page allows for edits in Price, Quantity, and Order. The Batch edit >> Description / Tags page allows for edits in Category, and the Batch edit >> Shipping page allows for edits in Price, Quantity, and Order.
The calendar
The Hyena Cart calendar is a page that many shoppers use to browse shops. It is a listing of stores which are "stocking" on certain days and are thus interesting to shoppers who like to see new items.
Your store will automatically be placed on the calendar based on the "Go live dates" of your listings. Your store can appear on the calendar once per week. If you have listings going live at several times during the week, your store will be displayed on the calendar on the latest "Go live date." For example, if you have listings going live on Monday, Wednesday and Friday of a given week, your store will appear on Friday of that week.
If you create your listings but your store does not show up on the calendar, there are a few things to check:
- It can take up to an hour for the calendar to update, so make sure it's been at least an hour since you created your listings
- Make sure at least one of your listings for the given date is marked "Show"
- Make sure there isn't a listing with an unexpected "Go live date" (caused by a typo) which is causing your store to show up later in the week than you expect (the Product listings >> Batch edit >> Dates page is an easy way to scan all of your dates at once
- If all else fails, give us a shout at the support desk (support [at] hyenacart.com) and we'll see if we can help figure out the issue
The site search
Shoppers can search through all Hyena Cart stores via the search bar at the top right of the HC pages, or via the Advanced search page.
If you find that your items aren't showing up in the search, check the following things:
- It can take up to an hour for the search database to update, so make sure it's been at least an hour since you created your listings
- Make sure that your listings are marked "Show"
- Make sure your "End Dates" are not set in the past ("0000-00-00 00:00:00" means there is no end date, so that's okay). The Product listings >> Batch edit >> Dates page is an easy way to scan all of your dates at once
- Make sure your listings are properly tagged
- If all else fails, give us a shout at the support desk (support [at] hyenacart.com) and we'll see if we can help figure out the issue
Spots (marking as favorite)
Shoppers can Spot your listings from your item listing pages. This is a way for them to mark the item as a favorite and then view it in the future on their "My HC" page.

In addition, Spotted items are highlighted in the left-hand section of the calendar pages, and on two other pages: Random Spots and Most Spots (located from the Shop >> Spots menu on the main Hyena Cart pages).
You can view the number of Spots your items have received on your Product listings >> View / edit items page, in the column marked "Spots".
Orders
Great! So now you have your store set up. Let's look at what happens when a shopper purchases one of your items.
Order creation and order history
The manner in which orders are created in your Hyena Cart store is dependent on the Stocktype of the listing.
- Standard listing: Recall for a Standard listing: This is the default stocking method. Items in this method remain in-stock until the customer checks out with them.
Multiple customers can cart these items simultaneously, leaving the possibility of overselling. However, this is the only method that allows customer choices and product
quantities greater than one. In most cases, Standard listings are the typical choice.
For a standard listing, the order is created when the shopper completes the checkout process. This is what the checkout process looks like:
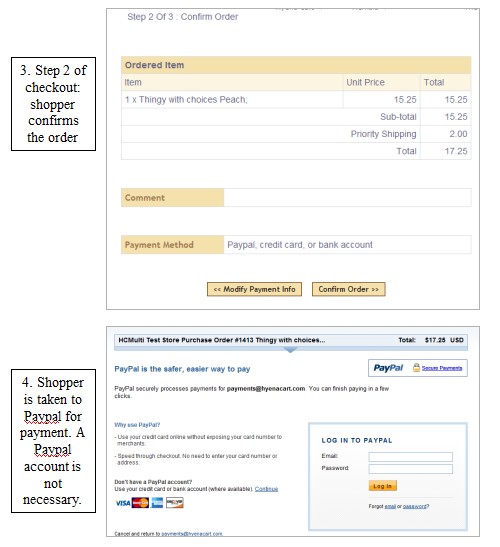
The order is created when the shopper clicks "Confirm order" and you will be able to view it in your Order History:
However, you will not receive email notification of the order, and your inventory control will not remove the items from your stock *until payment is completed via Paypal.*
Clicking on the order number will bring up the Order details page:
If payment has been made, the Order Status will be marked as "Paid" and the shopper's name and address will be filled in. You can package the item and ship it out, changing the order status to "Shipped" at that time.
If you find an incomplete order in your order history, there are several possibilities:- If the shopper was logged in when the purchase was made, then you can go to the Order Details page, locate the buyer's email address in the Buyer Email field, and
contact the shopper to see if he or she would like to complete the order.
If the shopper would like to complete the order, you can direct them to their My HC >> Purchase history page, on which they should find the order and a link to pay for it: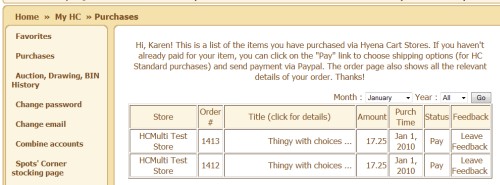
If it's been a while since the order was created, you can also assume that this order is an "abandoned cart" and simply mark the order as "Cancelled." - If the shopper was not logged in at the time, there will be no contact information in the Order Details page. You should go ahead and assume this order is an abandoned cart and mark the order "Cancelled.
- If the shopper was logged in when the purchase was made, then you can go to the Order Details page, locate the buyer's email address in the Buyer Email field, and
contact the shopper to see if he or she would like to complete the order.
- Hold listing: Recall for a Hold listing: With this method of listing, only one customer will be able to cart the item.
The item will be held in that customer's cart for 10 minutes. If the customer does not complete checkout within that amount of time,
the item automatically restocks. Pending items are marked "Pending" in the store, with a count down to let other customers know when to expect the item to be
restocked if payment is not completed. In general, this is a good option for high-demand items. However, there is a slight chance of overselling if a customer
is still in Paypal completing checkout when the restocking time occurs.
This images shows both what the shopper sees and what the seller sees when a Hold item is purchased:
Again, the order is not created until the shopper completes the third step of the checkout process (clicking "Confirm order") and the transaction is not complete until payment is made via Paypal. - Buy now listing: Recall for a Buy now listing: This is similar to HC Standard's Buy Now-style listing. The first customer to click "Buy Now"
is committing to purchase the item. It is immediately taken out of stock. In the event that the customer does not complete payment, the seller
can restock the item from the Modify listing view.
As with "Hold" listings, the "Buy now" listings do not create an order until the shopper completes the third step of the checkout process (clicking "Confirm order"). However, the item *is* taken out of stock immediately upon clicking of the "Buy now" button.
The shopper received confirmation on the listing page that she has successfully purchased the item, and can also check for success on her My HC >> Auction, Drawing, Buy Now page. The seller can restock the item on the Modify listing page in the event that the buyer does not complete payment.
Note that failure to complete payment on a Buy it Now listing is a breach of the Hyena Cart user agreement and can result in the loss of purchasing privileges for a shopper. As a seller, please keep track of repeat offenders and report them to the support desk at support [at] hyenacart.com. For Drawings and Auctions, you will be able to flag non-paying shoppers, but for BiN's this tracking must be done manually. - Auction listing: Recall for an Auction listing: This option allows you to offer your item by auction. See the
Fake Auction for more details.
With Auction listings, the order is created, and the confirmation emails are sent out as soon as the auction is over and the listing page is refreshed.
After that, when the high bidder visits the listing page, the item will be automatically added to her shopping cart. She can then continue shopping, adding any other desired items, and complete checkout as usual. Note that she can also view her bids on auctions on her My HC >> Auction, Drawing, Buy Now page.
You can view a list of bidders with full email addresses via your Product Listings >> View / edit items page. Just click on the word "Auction" in the stocktype column. This brings up a list of bidders. - Drawing listing: Recall for a Drawing listing: This is another way to offer a high-demand item. Customers may enter their name to have a chance at
purchasing the item. At the specified end time, a drawing winner is randomly chosen from the entrants.
With Drawing listings, the order is created, and the confirmation emails are sent out as soon as the drawing is over and the listing page is refreshed.
After that, when the drawing winner visits the listing page, the item will be automatically added to her shopping cart. She can then continue shopping, adding any other desired items, and complete checkout as usual. Note that she can also view her drawing entries on her My HC >> Auction, Drawing, Buy Now page.
You can view a list of entrants with full email addresses via your Product Listings >> View / edit items page. Just click on the word "Drawing" in the stocktype column. This brings up a list of drawing entrants and you are able to delete entrants, if necessary.
Order creation summary table
That probably seemed like a lot, but just keep in mind that 99% of the time, the Standard listing method is all you will need and you can just focus on that process. As you get more comfortable with Hyena Cart, you may want to branch out and try offering some listings via Auction or Drawing.
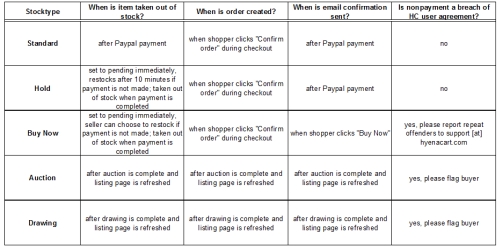
Here is a summary table that shows when orders are created, when confirmation emails are sent out, etc. for all 5 listing methods (click the table to see a larger image).
Feedback and flagging
Once an order has been placed and paid for via Paypal, the shopper will be able to leave feedback for the transaction. If your shoppers have questions about how to leave feedback, you can direct them to this page.
In the case of normal feedback, there is no notification sent to the seller. However, in the case of negative feedback, the seller will receive an email notification so that a resolution can be agreed upon with the shopper. You will be given the opportunity to resolve the situation and respond to the buyer's feedback. If the buyer is satisfied with the resolution, he / she can then mark the feedback resolved. You can view your feedback via the drop-down menu in your store, the feedback icon in the upper right of the store page, or via the View Store >> Feedback menu from your vendor pages.
If you would like to flag a buyer for non-payment in the case of a drawing or auction, you can do so via the Order History page (use the Flag link all the way to the right of the order table). These flags are not visible publicly, but if a shopper is flagged by multiple sellers, he / she may be blocked from shopping at Hyena Cart.
If you have any situations regarding feedback and flagging that cannot be resolved between you and the buyer, please contact support [at] hyenacart.com for assistance. Please do try to resolve the situation between the transaction parties first.
How to promote your store
There are, of course, many different ways you can promote your shop. Hyena Cart offers several built-in tools to bring shoppers into your store. These can be found on your vendor pages under the Promote menu.
- Featured shops: The first option is the featured shop ads. Details regarding how to run an ad and where the ads run can be found here.
- Google Base: Google Base is Google's searchable directory of products and services. Including your listings on Google Base is free and can gain them exposure to a new audience. Details on using Google Base with Hyena Cart can be found here.
- Marketplace forum: Hyena Cart has a forum filled with shoppers and sellers alike. You are welcome to post store promotions in the
Marketplace Forum. In addition, many sellers
have built relationships and found loyal shoppers by posting in the forums in general conversations (you can place a link to your store in your forum signature after 10 posts). Finally, you can
contact a moderator and request access to the Shop Talk forum, where sellers lend sympathetic ears and helping hands to one another.
Within the forums, you'll also see the concept of HC$. This is "play money" that forum users earn simply by posting and participating in conversations. Sellers will often feature promotions sellling certain items within their store that can be paid via HC$. You can then use your HC$ to purchase banner advertising within the forums. More details are posted here and here.
Note that the forums require separate registration from your vendor account (and shopper account, if you have one). - Banner Manage: Banner Manage is the banner management system used at Hyena Cart. Information regarding it's use can be found
here. Banners can be paid for via Paypal or HC$.
Note that Banner Manage require separate registration from your vendor account (and forum and shopper accounts if you have those). We do realize that it's a pain having all these different accounts. It is a to-do list item to integrate everyone into one, big Hyena Cart login, but we just haven't gotten to it yet! - Stocking Calendar: This is not found under the Promote menu, but the stocking calendar is definitely a way to bring shoppers into your store. Most sellers find that the most effective way to use the calendar is to create a good number of new items, then list them, all with the same 'Go live date', to make the store stockings more of an event. Recall that your store will appear on the calendar automatically based on the 'Go live date' of your listings.
That's it! Again, we hope you find Hyena Cart to be one of the most customizable, affordable, and easy-to-use selling venues on the web. Please send feedback on this manual, and the site in general, to support [at] hyenacart.com. Thanks!

